INTRO
Hello readers, Today in this blog you’ll learn how to create an Animated Login Form smooth Transition using only HTML, CSS, and JavaScript. Earlier I shared a blog on Pure CSS tabs with slide indicators and now I’m going to create a Login and Registration form with a smooth transition.
Now first you have to understand what the login forms are. The login form allows you to access your website or, web application, and thus your data. This form performs a critical security function; just the same, it is frequently overlooked when determining if the methods for the user name (user), keys (passwords), and authentication meet security requirements.
Importance of Login Forms
Particularly for online stores or e-commerce websites, a login page is crucial to the design of websites and mobile applications. A unique and appealing login page will immediately draw users’ attention drive a lot of traffic to your website, and grow your customer base. The majority of login pages contain components like a highlighted CTA, (Computed Tomography Angiography) a username, and a password.
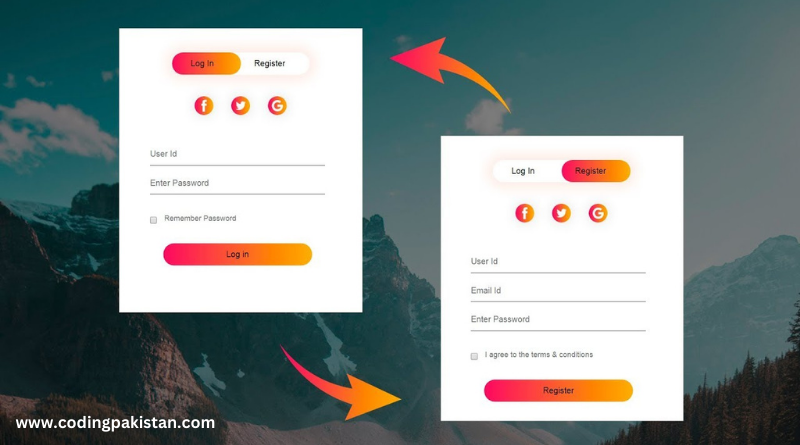
We must as that designing a login page may be difficult and time-consuming, and as the world’s premier design platform. On the internet and in the online world, there are many sorts of login forms available in the market, so today, we are going to learn how to make a fascinating and attractive login and registration form by using HTML, CSS and simple JavaScript step by steps. You can see this in the picture given below

In this design we have one login form and you can see two buttons here when you will click on the register button it will display the registration form and when you click on the login button it’ll again come back to the login form and when you will click on the buttons you will feel the smooth transaction when it’ll move from login to register and register to login because we have applied transition in it. Similarly in the login and registration form also. And also we applied icons in this form.
We used HTML for text and headings, but the essential thing is CSS because CSS properties are used to create this appealing login page design. This type of gorgeous design would be impossible to create without CSS style. Unless you use other CSS libraries such as Tailwind CSS, TailBlock, and so on.
Video Tutorial of Login/Registration form with smooth CSS transition:
Credit Of this Video Easy Tutorials Channel like here click
In the video, you’ve seen the Login/Registration Form with smooth Animation and I hope you’ve understood the basic codes behind creating this program. This is a pure HTML, CSS, and JavaScript program so when you entered your info and submit the form, it won’t redirect you to any other pages/sites. If you know JavaScript, then you add some advanced features to this form like – validation of the input field, showing or hiding the password toggle button, and many more.
If you like this program (How To Make Login & Registration Form Using HTML, CSS & JavaScript) and want to get source codes. You can easily get the source codes of this program. To get the source codes you just need to scroll down. You can use this Login Form in your HTML pages, websites, and projects.
Creating a Login form Step by Step
- First, we’ll create two files: one is HTML and the second is CSS.
- Then we’ll link the CSS file with the HTML file.
- We only need the bare minimum of code in an HTML file for the heading, input field, login button, and some text.
- In the HTML file, we give the classes of all elements and targets; in the CSS file, we can also use inline CSS, so we don’t need to create a separate file of CSS styles.
- Now, navigate to the CSS file. Write some basic code and then adjust the design as desired. For example, the button color is red, but you don’t need red, so alter the backdrop color to “yellow.
As you can see I have provided you the HTML source code but first, you have to make a file with the name (index.HTML) then copy this source code given below and just paste it into the program.
HTML FILE
<!DOCTYPE html>
<!-- Created by Coding Pakistan  www.codingpakistan.com-->
<html lang="en">
<head>
    <meta charset="UTF-8">
    <meta http-equiv="X-UA-Compatible" content="IE=edge">
    <meta name="viewport" content="width=device-width, initial-scale=1.0">
    <title> Login/Register Form @CodingPakistan </title>
    <link rel="stylesheet" href="style.css">
</head>
<body>
    <div class="hero">
        <div class="form-box">
            <div class="button-box">
                <div id="btn"></div>
                <button type="button" class="toggle-btn" onclick="login()"> Login </button>
                <button type="button" class="toggle-btn" onclick="register()"> Register </button>
            </div>
            <div class="social-icons">
                <img src="fb.png" alt="">
                <img src="tw.png" alt="">
                <img src="gp.png" alt="">
            </div>
            <form id="login" class="input-group">
                <input type="text" class="input-field" placeholder="User ID" required>
                <input type="text" class="input-field" placeholder="Enter Password" required>
                <input type="checkbox" class="check-box"> <span> Rememeber Password</span>
                <button type="submit" class="submit-btn"> Login </button>
            </form>
            <form id="register" class="input-group">
                <input type="text" class="input-field" placeholder="User ID" required>
                <input type="email" class="input-field" placeholder="Email ID" required>
                <input type="text" class="input-field" placeholder="Enter Password" required>
                <input type="checkbox" class="check-box"> <span> I agree to terms and conditions</span>
                <button type="submit" class="submit-btn"> Register </button>
            </form>
        </div>
    </div>
    <script>
        var x = document.getElementById("login");
        var y = document.getElementById("register");
        var z = document.getElementById("btn");
        function register(){
            x.style.left = "-400px"
            y.style.left = "50px"
            z.style.left = "110px"
        }
        function login(){
            x.style.left = "50px"
            y.style.left = "450px"
            z.style.left = "0px"
        }
    </script>
</body>
</html>
Then make a file with the name (style.CSS) and copy this CSS source code and paste it into the style.CSS file now just connect this style.CSS file with index.HTML by using <link rel=” stylesheet” href=”style.css”>
CSS FILE
/* Created by Coding Pakistan  www.codingpakistan.com */
*{
    padding: 0;
    margin: 0;
    font-family: sans-serif;
}
.hero{
    height: 100%;
    width: 100%;
    background-image: linear-gradient(rgba(0,0,0,0.4),rgba(0,0,0,0.4)),url(banner.jpg);
    background-position: center;
    background-size: cover;
    position: absolute;
}
.form-box{
    width: 380px;
    height: 480px;
    position: relative;
    margin: 6% auto;
    background: white;
    padding: 5px;
    overflow: hidden;
}
.button-box{
    width: 220px;
    margin: 35px auto;
    position: relative;
    box-shadow: 0 0 20px 9px #ff61241f;
    border-radius: 30px;
}
.toggle-btn{
    padding: 10px 30px;
    cursor: pointer;
    background: transparent;
    border: 0;
    outline: none;
    position: relative;
}
#btn{
    top: 0;
    left: 0;
    position: absolute;
    width: 110px;
    height: 100%;
    background: linear-gradient(to right, #ff105f,#ffad06);
    border-radius: 30px;
    transition: .5s;
}
.social-icons{
    margin: 30px auto;
    text-align: center;
}
.social-icons img{
    width: 30px;
    border-radius: 50%;
    margin: 0 12px;
    box-shadow: 0 0 20px 0 #7f7f7f3d;
    cursor: pointer;
}
.input-group{
    top: 180px;
    position: absolute;
    width: 280px;
    transition: .5s;
}
.input-field{
    width: 100%;
    padding: 10px 0;
    margin: 5px 0;
    border-left: 0;
    border-top: 0;
    border-right: 0;
    border-bottom: 1px solid #999;
    outline: none;
    background: transparent;
}

.submit-btn{
    width: 85%;
    padding: 10px 30px;
    cursor: pointer;
    display: block;
    margin: auto;
    background: linear-gradient(to right, #ff105f,#ffad06);
    outline: none;
    border: none;
    border-radius: 30px;
}
.check-box{
    margin: 30px 10px 30px 0;
}
span{
    color: #777;
    font-size: 12px;
    bottom: 68px;
    position: absolute;
}
#login{
    left: 50px;
}
#register{
    left: 450px;
}
And now you’re Login and Registration form is ready. You can also view this video if you want to learn it more deeply.
You might like this:
That’s all, now you’ve successfully created a Login and Registration Form in HTML CSS & JavaScript. If your code doesn’t work or you’ve faced any error/problem then please download the source code files from the given download button. It’s free and a .zip file will be downloaded then you’ve to extract it.
If you have any questions about this please ask in the comment section I will answer as soon as possible
Email: Cotact@codingpakistan.com
